How to Write Letters: Step-by-Step Guide to Letter Formation for Kids

 Discover a Free Education Video App for Kids
Pastory uses AI to personalize educational video content based on your child’s interests and personality. Safe, engaging, and built for curious young minds. Sign up now to stay updated and enjoy early access with a free trial

Learning to write letters is one of the most foundational skills a child develops — and it goes far beyond simply putting pencil to paper. Proper letter formation requires mastering stroke direction, spatial awareness, pencil control, and the connection between written symbols and the sounds they represent.
This guide covers everything parents and educators need to know: from the basics, to practical activities, step-by-step teaching methods, and tips for helping kids who struggle. Whether you are working with a preschooler just starting to trace letters or an early elementary student ready for independent writing, this guide provides a clear, research-informed path forward.
What Letter Formation Means
Letter formation refers to the process by which a child learns to construct the letters of the alphabet correctly — using the right strokes, in the right order, moving in the right direction. It is a physical and cognitive skill that develops over time and requires consistent practice, good instruction, and age-appropriate tools. Understanding what letter formation includes and what it requires helps parents and teachers set realistic expectations and choose the right activities from the start.
Difference Between Print and Cursive Writing
Print letters, also called manuscript or block letters, are formed as separate, disconnected shapes. Cursive letters are connected in a flowing style, where the pencil rarely leaves the paper. Most educators begin with print because the strokes are simpler and more closely match the letters children see in books. Cursive is typically introduced in grades 2–4, once print formation is solid, although this varies by curriculum and country.
Common Patterns in Letter Formation
Many letters share underlying stroke patterns, which makes teaching by shape group more effective than teaching in alphabetical order. Common patterns include the vertical pull-down stroke (used in “l,” “t,” “i,” “j”), the circle or oval curve (used in “a,” “d,” “g,” “o,” “q”), the bump shape (used in “n,” “m,” “h,” “r”), and the diagonal (used in “v,” “w,” “x,” “y,” “z”). Recognizing these groups with shared movements helps children transfer skills from one letter to the next more efficiently, and gives teachers a logical way to sequence instruction.
Why Proper Formation Matters
Correct letter formation is not just about neat handwriting. It supports reading development, builds fine motor skills, and has measurable effects on a child’s long-term academic performance. Understanding why letter formation is important helps parents and educators stay motivated through the slow, incremental work of teaching it well.
Impact on Reading and Writing Skills
Research consistently links handwriting practice to stronger literacy outcomes. A study found that children who practiced writing letters by hand showed stronger neural activation in reading-related brain regions than those who only typed or traced. When kids write by hand, they reinforce letter-sound connections and recognition more deeply than through passive recognition alone.
Role in Motor Skill Development
Letter formation is a fine motor task that requires precise coordination between the fingers, hand, and wrist. Practicing letter writing builds hand strength, pencil control, and dexterity — skills that transfer to many other daily tasks. Children who develop solid motor control early tend to write more fluently and with less fatigue, freeing up cognitive energy for composing and thinking rather than concentrating on the physical act of writing.
Long-Term Academic Benefits
Strong handwriting foundations support academic success across subjects. When children can write letters automatically and correctly, they can focus on higher-order thinking — organizing ideas, spelling, and constructing sentences — rather than concentrating on how to form each character. Studies suggest that students with legible, fluent handwriting perform better on written assessments, particularly in timed settings. Building correct habits early is far easier than correcting ingrained errors later.
Key Skills Needed for Writing Letters
Before a child is ready to start forming letters, several foundational skills must be in place. Rushing without these building blocks often leads to poor habits that are difficult to correct.
Pre-Writing Skills Development
Pre-writing skills are the drawing and tracing abilities that prepare the hand and brain for alphabet letter formation. These include copying vertical and horizontal lines, drawing circles, connecting dots, and tracing simple shapes.
Most children are ready to begin structured pre-writing practice around age 3–4. Activities like coloring within outlines, tracing dotted paths, and drawing simple figures all build the visual-motor coordination needed before kids start forming letters on lined paper.
Hand Strength and Pencil Grip
A child’s hand must be strong enough to hold and control a writing tool before letter formation can begin in earnest. Weak grip often leads to poor pencil control, incorrect formation, and writing fatigue.
Exercises that build hand strength include playdough manipulation, squeezing sponges, using child-safe scissors, and threading beads. The correct pencil grip for most children is the dynamic tripod grip — thumb, index finger, and middle finger — though variations exist and some children may benefit from a pencil grip aid.
Directionality and Spatial Awareness
Understanding directionality means knowing that English text moves from left to right and top to bottom, and that each letter has a defined starting point. Spatial awareness involves understanding concepts like “above the line,” “below the line,” “inside,” and “outside.” These skills are often developed through movement activities, spatial language during instruction (“start at the top, pull down”), and consistent use of reference tools like an alphabet strip or lined paper with a clear baseline — all of which help children learn how to form letters correctly before they write independently.
Step-by-Step Process to Teach Letter Formation to Kids
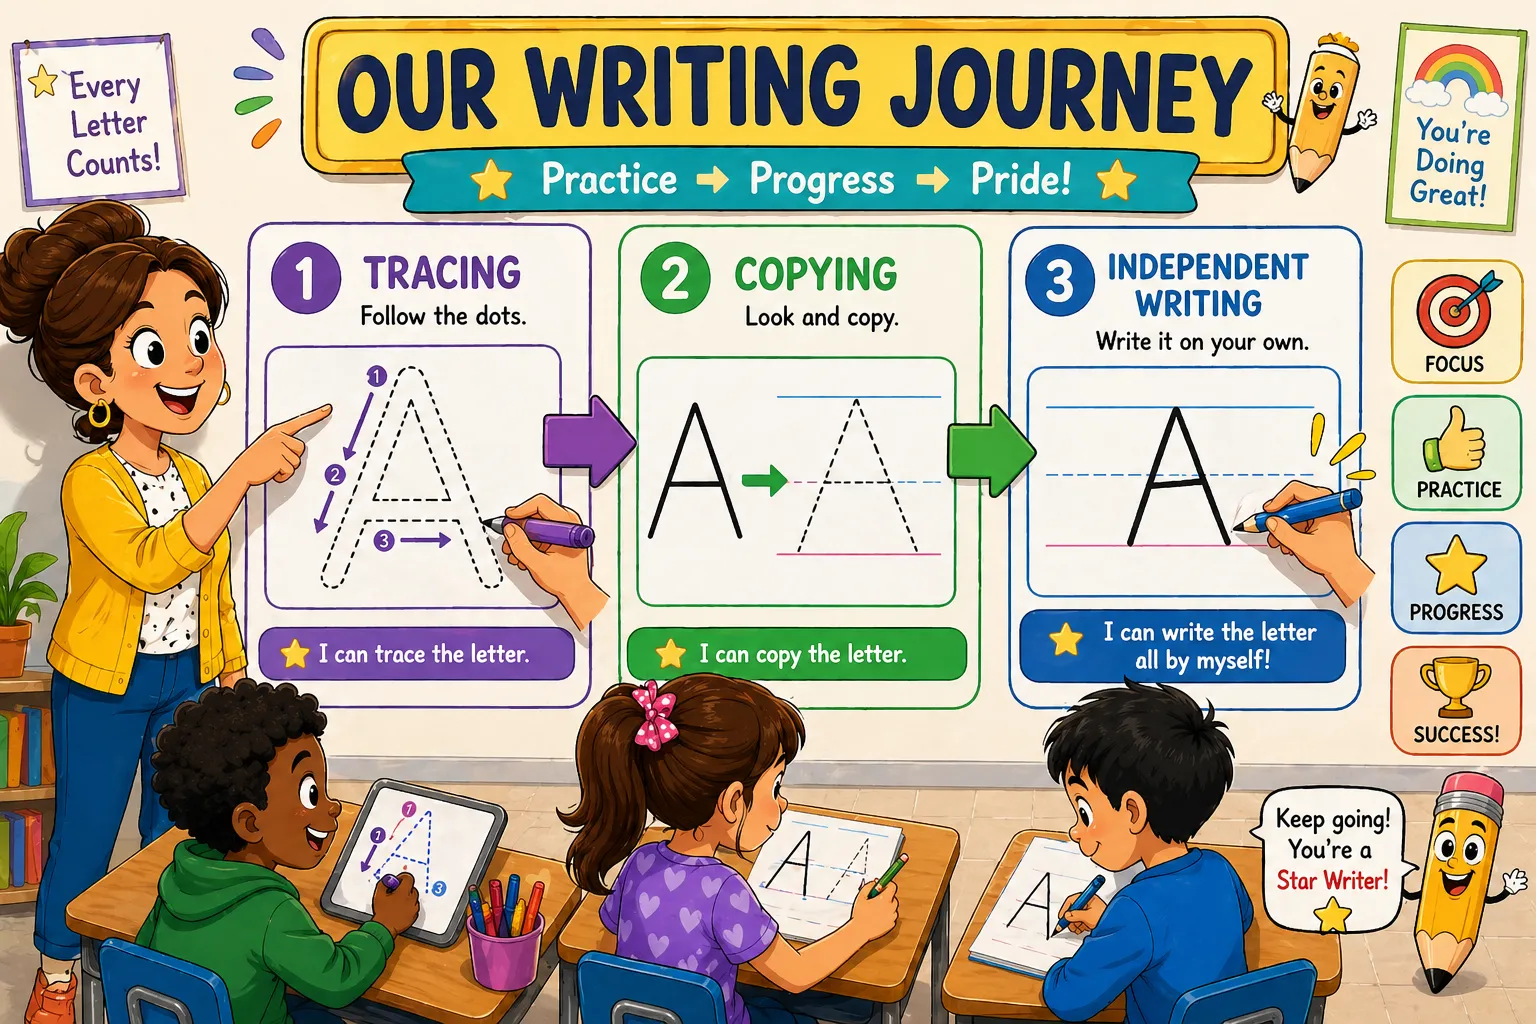
Teaching letter formation works best as a gradual progression — from exploration to guided practice to independent application. The steps below offer practical, sequenced ways that work across a range of ages and learning styles.
Start with Pre-Writing Activities
Before introducing the alphabet, give children time to develop foundational strokes through drawing and play. Ask them to draw straight roads (vertical lines), rainbows (arches), and wheels (circles). These exercises are not just warm-ups — they are the parts of a letter broken down to their simplest form, and they make children ready to write actual characters with far greater ease.
Teach Basic Strokes First
Introduce the four core strokes: the vertical pull-down, the horizontal stroke, the diagonal line, and the curve. Children who can draw these strokes reliably are ready to begin combining them into letters. Programs like Handwriting Without Tears use this stroke-first approach precisely because it gives kids a toolkit they can apply across multiple letters rather than learning each one in isolation.
Group Letters by Similar Shapes
Rather than following alphabetical order, group letters by their shared stroke patterns:
- Circle: a, d, g, o, q, c, e
- Pull-down: l, i, j, t, u, y
- Bump and arch: n, m, h, b, p, r
Teaching in these groups helps children focus on letter formation patterns more deeply and reduces confusion between similar-looking characters. It also gives teachers a clear structure for sequencing instruction over several weeks.
Introduce Names and Sounds
Once a child can write the letter correctly, connect it to its name and sound. This phonics integration reinforces both literacy and handwriting simultaneously. For example, while practicing the letter “s,” have the child say its sound (“ssss”) with each stroke. Combining sounds with physical practice strengthens the link between the written symbol and its spoken equivalent — a key part of teaching the alphabet effectively.
Practice Direction and Stroke Order
Correct stroke direction is non-negotiable when teaching correct formation. Teaching a child to form letters incorrectly — even if the end result looks right — creates habits that slow down writing fluency and can cause letter reversals later. Always model stroke order explicitly, using verbal cues like “start at the top, curve around, pull down.”
Begin with Lowercase
Most educators recommend starting with lowercase letters because they appear more frequently in text, making them immediately more useful. There is ongoing debate about whether to teach uppercase letters first, but the evidence generally favors beginning with lowercase — they tend to have more distinct shapes, which reduces confusion. Start with high-frequency letters like “a,” “e,” “i,” “o,” “s,” and “t” before moving to less common characters.
Use Tracing and Templates
Letter tracing worksheets and templates give children a scaffold as they learn. A good worksheet shows the starting point, the stroke direction with arrows, and a dotted path to trace. After tracing several times, children should attempt to copy the letter independently. Avoid using writing worksheets that offer no guidance on direction or stroke order, as these can inadvertently reinforce incorrect habits that are hard to undo.
Encourage Independent Practice
Once a child can trace letters reliably, begin transitioning to independently writing them from memory. Offer blank paper or lightly lined paper and ask children to draw a letter without visual support. The goal is for correct formation to become automatic — a muscle memory that no longer requires conscious thought, allowing cognitive energy to be directed toward meaning and composition.
Effective Ways to Teach Letter Formation
Variety in teaching methods keeps children engaged and supports different learning styles. The most effective ways combine direct instruction with hands-on, multisensory experiences.
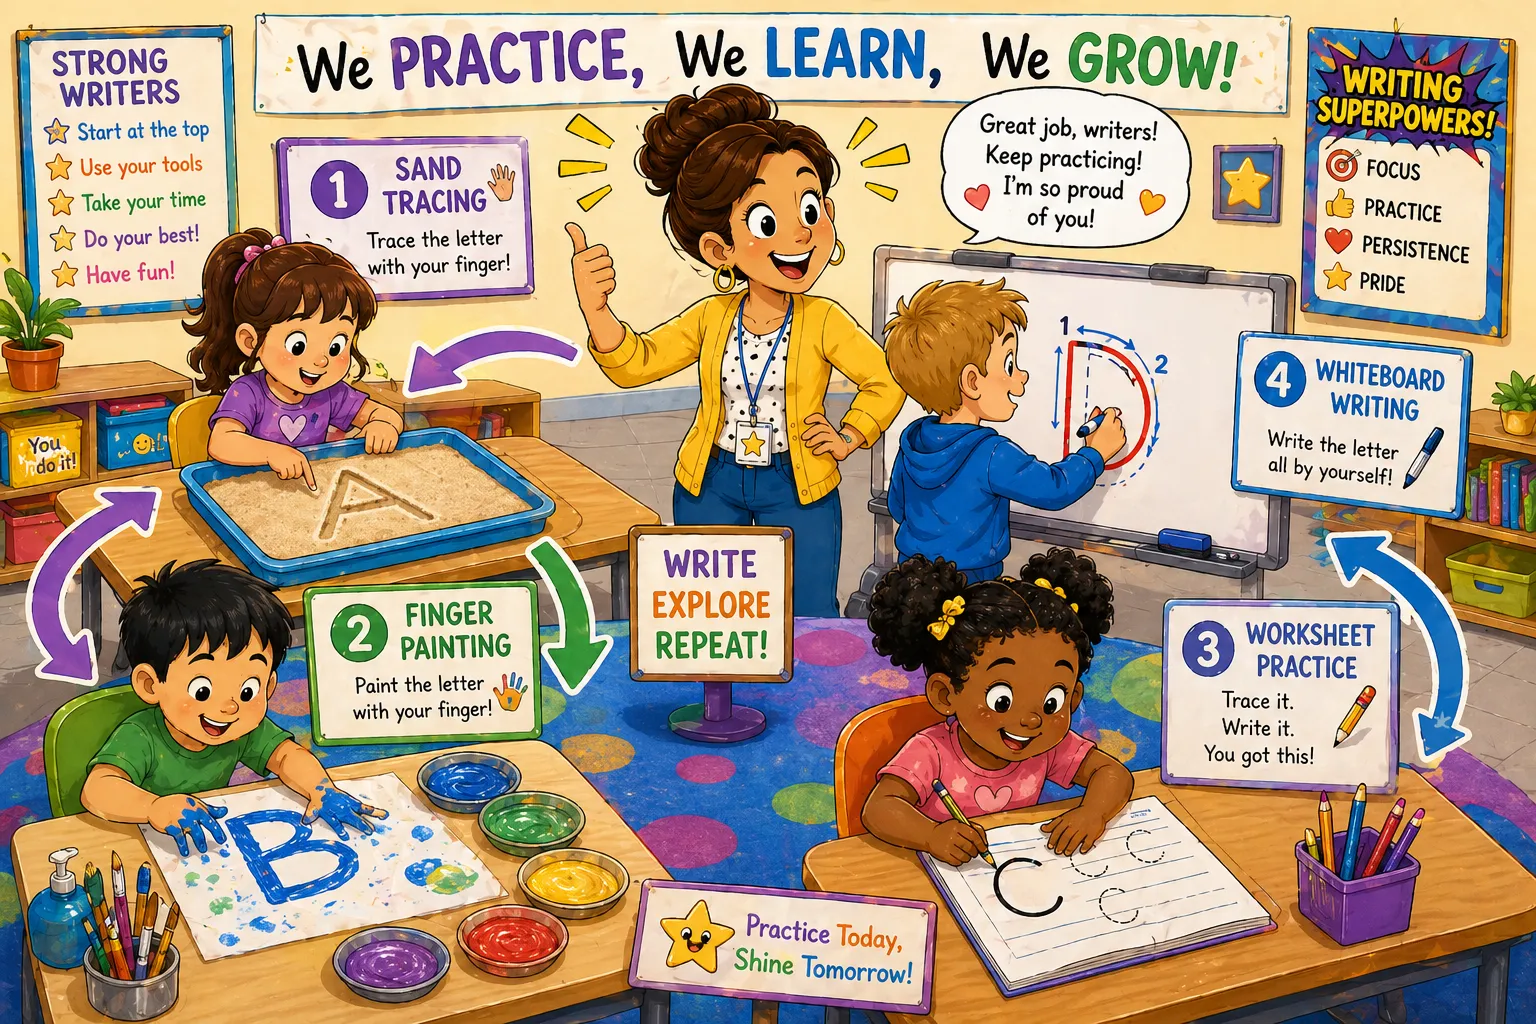
Multi-Sensory Writing Techniques
Multi-sensory instruction uses multiple senses simultaneously — touch, sight, and movement — to reinforce learning. Research in occupational therapy supports multi-sensory approaches for building motor memory. When you create a sensory-rich environment for practice, children engage more deeply and retain correct formation patterns more reliably. Examples include writing letters in sand, tracing them on a textured surface, or forming them in the air with large arm movements while saying the name aloud.
Sensory Activities
Sensory letter activities deserve special attention as a way to practice that goes beyond standard worksheets. Sensory activities engage the body alongside the mind, making correct formation feel intuitive rather than effortful.
Effective sensory methods include finger-tracing in a sand tray, pressing letters into playdough, or using a light box to trace them. These activities are particularly valuable for children who are ready to write but find the physical demands of pencil-and-paper practice frustrating.
Writing in Different Positions and Surfaces
Writing does not only happen at a desk. Practicing on vertical surfaces — like a whiteboard, chalkboard, or paper taped to a wall — activates different muscle groups and can improve pencil control when children return to horizontal work. Varying the surface and position keeps letter formation activities fresh, reduces resistance to practice, and builds strength in the hand and arm that supports better overall writing.
Letter Formation Activities for Kids
Purposeful, varied letter formation activities are the most effective way to develop and maintain correct formation skills in young children. The following are some of the best fun ways to teach formation at home or in the classroom.
Worksheets and Printable Exercises
Structured writing worksheets with clear arrows, starting dots, and dotted guidelines give children a consistent format for formation practice. Use worksheets that show one letter per session with multiple repetitions, progressing from tracing to independent writing on the same page. Writing worksheets work best when they are part of a broader routine rather than the only activity used.
Sand Tray and Finger Writing
Filling a shallow tray with sand, salt, or rice and asking kids to trace letters with their finger is one of the most effective tactile methods for building motor memory. This is a classic sensory activity that creates strong physical reinforcement of correct stroke direction and order. The sensory feedback of the material deepens the learning in a way that pencil and paper alone cannot replicate.
Playdough Formation
Rolling playdough into long ropes and shaping them into letters engages the hands physically in making up each letter from scratch. This kinesthetic method is particularly valuable for young children or those with weak fine motor skills. It also makes the activity feel like play rather than work — an important motivational advantage that helps kids practice formation without resistance.
Educational Games and Apps
Digital tools can supplement — but should not replace — hands-on formation practice. Apps like Handwriting Without Tears: Wet-Dry-Try and Letter School guide children through correct stroke order using touch-based interaction. These tools are most beneficial as reinforcement after children have already received direct instruction, and they give kids to practice at their own pace.
Order to Teach Letters Effectively
The sequence in which letters are introduced has a significant impact on how quickly and accurately children learn to form them. Teaching the alphabet in alphabetical order is rarely the most effective approach.
Teaching by Stroke Patterns
Grouping letters by shared strokes — circle, pull-down, bump — is more effective than alphabetical order. This approach reduces interference between certain letters that look similar, such as “b,” “d,” “p,” and “q.” By spacing out these specific letters across different teaching groups, educators help kids learn to form each one clearly before encountering a potentially confusing counterpart.
Recommended Sequence for Beginners
A widely used sequence for teaching letter formation to beginners starts with the easiest, most common characters:
- l, i, t, j (vertical pull-down)
- o, a, d, g, q (circle family)
- c, e (open circles)
- n, m, h, r (bump family)
- b, p (pull-down with bump)
- s, f, k, v, w, x, y, z (remaining)
This progression gradually increases difficulty while building on previously learned strokes, giving children a clear sense of progress.
Transition to Cursive Writing
Cursive writing is typically introduced after print is well established — usually around grades 2–3. Cursive can actually benefit children with certain learning differences, as connected strokes reduce the starting-point confusion that contributes to letter reversals.
Cursive writing becomes easier once basic print skills are consistent and automatic, as it relies on smooth, continuous hand movements rather than separate strokes. Introducing it at the right stage helps build rhythm, flow, and writing speed while reinforcing muscle memory. For many learners, especially those who struggle with spacing or stroke sequencing, this style can feel more natural because it minimizes frequent stops and lifts of the pencil, allowing ideas to be expressed more fluidly on paper.
Common Mistakes When Learning to Form Letters
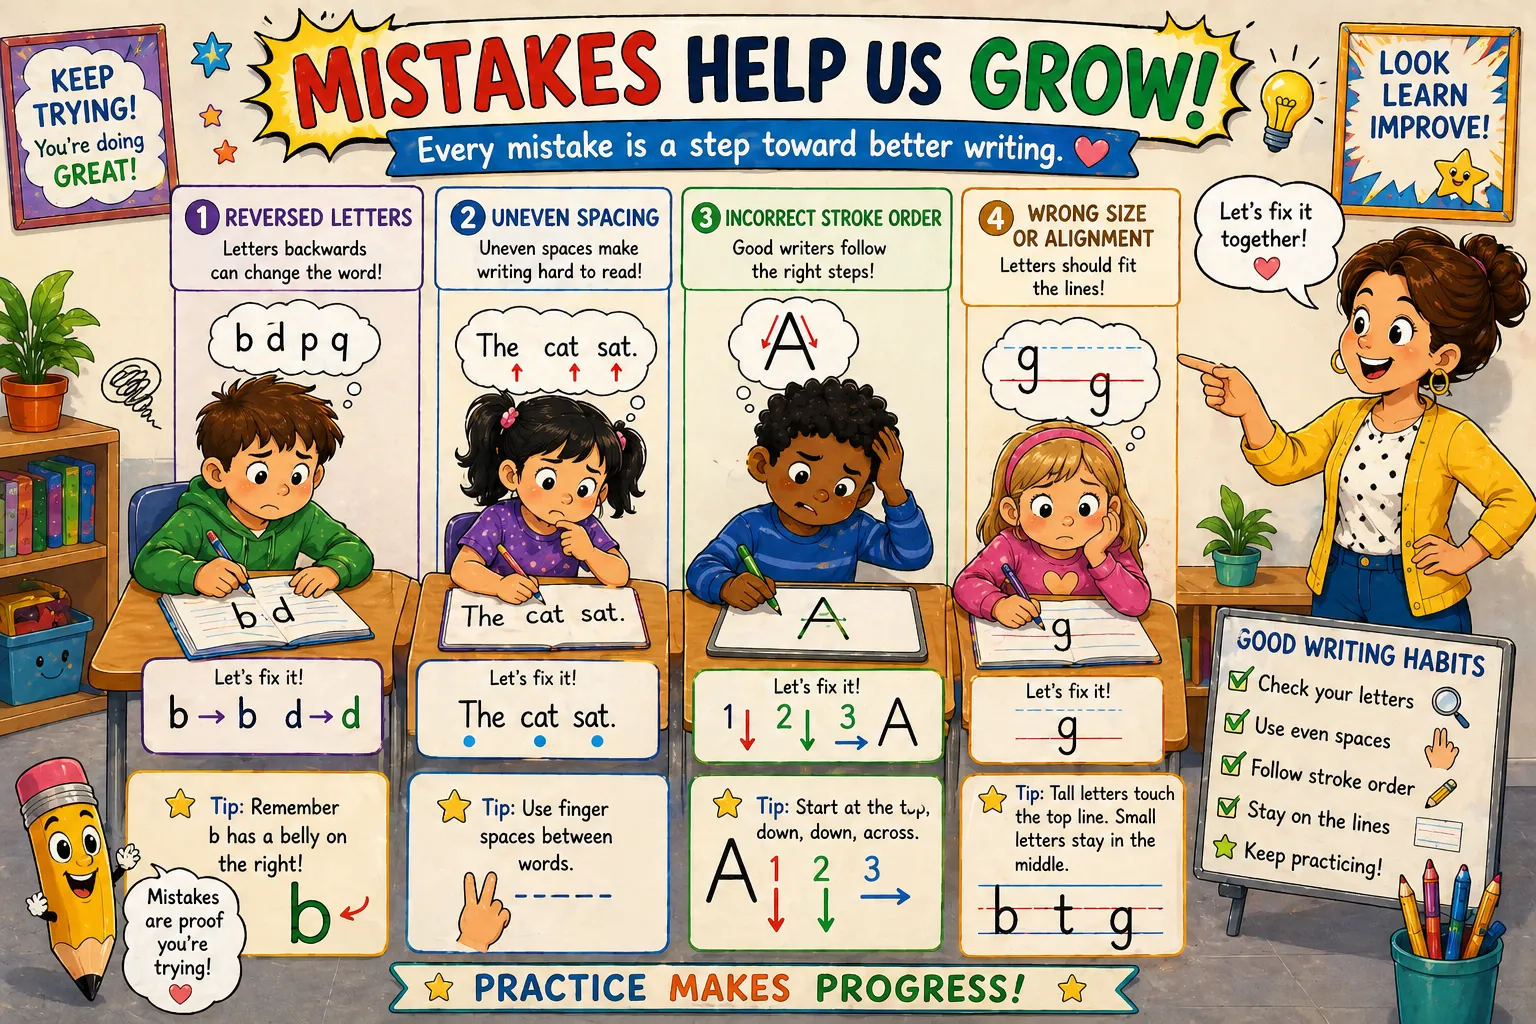
Awareness of common errors helps parents and educators intervene early before poor habits become permanent.
Starting Too Early Without Preparation
Introducing formal letter formation before a child’s fine motor skills are ready often leads to frustration, poor grip habits, and incorrect stroke formation. Most children are developmentally ready for structured writing practice between ages 4 and 5, though individual readiness varies. Prioritize pre-writing skills and hand strengthening before expecting correct letter formation.
Incorrect Stroke Direction
Forming letters from the bottom up, or drawing circles clockwise when they should go counterclockwise, creates habits that limit writing speed and fluency later on. These errors can feel natural to a child in the moment, but they become obstacles once writing speed demands increase. Teaching correct formation from the very first session is far easier than retraining ingrained patterns later.
Overusing Worksheets
Worksheets are useful tools, but overreliance on them produces passive, low-engagement practice. Children who spend most of their time tracing dotted lines without exploring letters in other contexts often struggle to generalize skills. Balance structured worksheet practice with open-ended formation activities — drawing, writing names, making labels, or illustrating simple stories with captions.
Tips for Teaching Letter Formation at Home and in Class
Small, consistent adjustments in routine and environment can make a meaningful difference in a child’s progress. These tips apply equally to parents working at home and teachers in the classroom.
Practice Consistency and Routine
Short, frequent sessions are more effective than occasional long ones. Ten to fifteen minutes of focused letter formation practice each day builds motor memory far more reliably than an hour-long session once a week. Integrating this practice into daily routines — writing a word on a shopping list, labeling drawings, or writing a simple note — reinforces learning in a low-pressure, meaningful context.
Use Proper Writing Tools
The right tools make correct letter formation significantly easier, especially for younger learners. Consider the following:
- Thick triangular pencils that naturally support correct grip
- Pencil grip aids for children who hold their pencil incorrectly
- Raised-line paper that provides tactile feedback about baseline position
- Chubby crayons or chalk for early mark-making before pencils are introduced
Matching the tool to the child’s developmental level removes unnecessary physical barriers to correct formation.
Provide Positive Feedback
Children who receive specific, encouraging feedback — “I noticed you started at the top and pulled down — great job!” — develop stronger confidence and motivation than those who receive only corrective criticism. Acknowledge effort and improvement, not just accuracy. A growth-oriented approach, where mistakes are treated as part of learning proper letter formation, supports both skill development and a positive attitude toward writing tasks.
Special Cases in Letter Formation
Not every child follows the typical developmental path. Some learners need tailored approaches when teaching letter formation skills, and recognizing these needs early makes a significant difference.
Teaching Left-Handed Writers
Left-handed children face unique challenges because most handwriting instruction is designed for right-handed learners. Key adjustments include tilting the paper counterclockwise (rather than clockwise), positioning the pencil about an inch above the point to allow visibility of written work, and encouraging a relaxed grip to avoid the “hook” wrist position many left-handed children default to. Using a pencil grip aid specifically designed for left-handers can help establish a comfortable, efficient technique that supports correct letter formation.
Helping Children with Writing Difficulties
Some children experience persistent difficulty with letter formation that may point to an underlying challenge such as dysgraphia, developmental coordination disorder (DCD), or low muscle tone. Signs include extreme pencil pressure, illegible or inconsistent formation despite instruction, slow writing speed, and physical discomfort during writing tasks. An occupational therapist can assess fine motor development and provide targeted letter formation skills support. Early identification leads to significantly better outcomes.
Fixing Poor Letter Formation
If a child has developed ingrained incorrect habits — starting from the wrong point, forming letters in reverse, or using inefficient strokes — corrective practice requires slowing down and making each step conscious again. Use verbal cues, visual models, and sensory activities to rebuild the correct movement pattern. In some cases, returning to pre-writing strokes before reintroducing letters is the most effective route to help kids learn correct formation from the ground up.
Final Thoughts on Learning to Write
Teaching children to write letters correctly is a gradual, layered process — one that begins long before a pencil is picked up and continues well into the primary school years. Letter formation skills include physical development (hand strength, motor control), perceptual understanding (spatial awareness, directionality), and cognitive connections (letter-sound links, stroke sequencing). When all of these elements are developed with patience and consistency, children not only form letters correctly — they build the fluency and confidence that support all future academic writing.
The most important principle is to prioritize understanding and automaticity over speed. Children who develop correct formation slowly and thoroughly outperform those who rush through the process. With the right activities, tools, and encouragement, every child can become a confident, capable writer.
Frequently Asked Questions
What Is the Correct Way to Write Letters?
The correct way to form letters involves starting at the designated point — usually the top — and following a specific stroke direction. Each letter of the alphabet has a defined sequence of strokes that makes it up efficiently. Using standard school handwriting guides provides a consistent model for correct letter formation. Verbal cues during instruction (“start at the top, pull down, bump”) help children internalize the correct process and maintain it during independent writing.
Should You Teach Uppercase or Lowercase First?
Most educators recommend teaching lowercase letters first, as they appear far more frequently in printed text and tend to have more distinct visual shapes. Teaching uppercase first is sometimes suggested in certain curricula, but the evidence generally favors starting with lowercase — children can begin reading and writing real words sooner as a result. Uppercase and lowercase letters can then be paired once lowercase formation is well established.
Why Do Some Children Struggle with Writing?
Children may struggle with letter formation for a range of reasons, including underdeveloped fine motor skills, limited pre-writing experience, difficulty with spatial awareness, or an underlying condition like dysgraphia or developmental coordination disorder. In some cases, children simply need more time and varied practice. If difficulties persist despite consistent instruction, an evaluation by an occupational therapist or educational specialist is recommended.
How to Practice Writing at Home
Effective home practice does not require elaborate materials. Simple daily habits make a significant difference and offer fun ways to teach letter formation outside of a classroom setting:
- Ask your child to write their name, a short word, or a single letter each day
- Use a small whiteboard for low-pressure, erasable practice
- Try sensory activities like finger-tracing in a sand tray or on a textured mat
- Incorporate writing into play — labeling drawings, writing grocery lists, or writing characters’ names in a story
Consistency, encouragement, and keeping sessions short and positive are the most powerful tools any parent has when teaching letter formation to kids at home.
How Long Does It Take to Learn Proper Handwriting?
There is no single timeline for developing proper handwriting — progress depends on a child’s age, fine motor readiness, practice frequency, and the quality of instruction they receive. Most children develop legible, functional print handwriting somewhere between ages 5 and 7, with fluency and consistency continuing to improve through age 9 or 10. Cursive, when introduced, typically takes an additional one to two years to become comfortable and automatic.
What Tools Help Improve Handwriting Skills Fastest?
Some of the most effective options include:
- Triangular or ergonomic pencils
- Pencil grip aids, such as the Crossover Grip or Stetro Grip
- Raised-line or highlighted paper
- Sand trays or textured writing surfaces
- Handwriting apps
Matching the tool to the child’s specific challenge is the key. A child who struggles with grip needs a different solution than one who has trouble staying on the baseline or maintaining consistent size. Observing where a child’s handwriting breaks down helps identify which tool will have the greatest impact.
How Often Should Kids Practice Writing?
Short daily sessions are far more effective than longer, irregular practice. Research on motor skill development consistently shows that frequent, spaced repetition produces stronger and more durable learning than massed practice. For most young children, ten to fifteen minutes of focused handwriting practice per day is ideal — enough to build motor memory without causing fatigue or frustration.